The weekend before last, my pictures from one local redwood forest got rave reviews. This weekend, another redwood forest — arguably much more spectacular — and I get yawns. For good reason, mind you, the pictures from the previous week were much better.
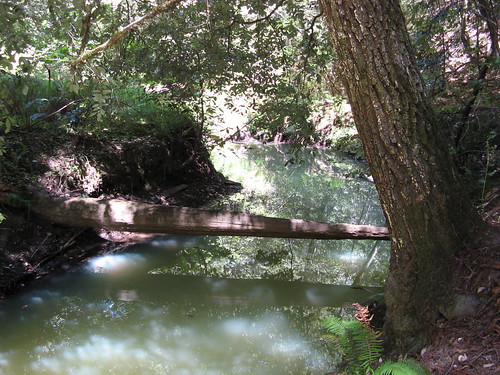
The main culprit (beyond my photographic ineptitude) is the sun: it does crazy things to the visual canvas of the forest and drives a camera’s metering system batty because it can’t figure out how to set shutter, aperture, ISO, etc., so some part of the picture comes out overexposed, another comes out underexposed, and almost none of it feels properly lit. Here’s an example from Saturday’s hike at Big Basin Redwoods State Park:
To the human eye, it’s a lovely setting with still water to produce nice reflections. Direct sun, however, plays havoc with the camera, creating a leopard-spotting effect that makes it almost impossible to glean a good photograph.
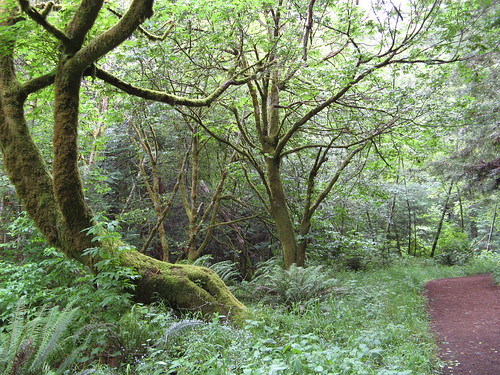
Now, for comparison, a shot taken two weekends ago at Purisima Creek Redwoods Open Space Preserve, on a day when the whole park was clouded in by fog from the coast:
Here you can actually see what the trail and the vegetation look like because clouds deflect direct sunlight and prevent the leopard-spotting effect.
I’d love to know what real photographers do in these settings. Using a flash might help the foreground but you’d still get blown-out areas beyond the flash’s range. I’m sure the better cameras (I still refuse to pay more than $300 for mine) can handle these light variations better.
This’ll be something I’ll be working on this summer in the local parks; I don’t plan to spend my weekends sweating out the miles under direct sun as I’ve done in summers past.
Any tips y’all can pass along are welcome.


Tom:
You may possibly regret asking how we handle lighting situations like the one in your post.
It is pretty much impossible to capture the full dynamic range of a scene that includes shadows (like the river bank in the foreground) and full sun (as seen in the background), especially if you shoot in jpg format. Sorry, but its true. So, one option is to just accept this limitation of point and shoot cameras and the techniques usually used by those who shoot with them. If you are after a record of the experience, as opposed to something aspiring to “art” (or even Art) this may be fine.
If your camera can capture photos in “RAW” mode and you are willing to work with the images a bit on your computer you can achieve better results. RAW mode records the actual data from the sensor in the camera. (jpg converts the data to a form that does not maintain all of the original sensor data.) One advantage is that RAW can handle a wider dynamic range – e.g. greater range of brightness. But even with RAW you are going to have some problems with a scene like this one. My approach might be to seemingly underexpose to avoid blowing out the highlights and to then make adjustments in software after downloading the files to my computer.
To really capture this extreme dynamic range you’ll need to employ some serious photography “tricks.” One that I use a lot is quite geeky, but can create great results. I use a tripod (and cable release and mirror lockup) and I take 2 or three shots at different exposures, some optimized for the highlights and others for the shadows. Then I combine the best parts of each image into a whole that replicates what you remember seeing when you were there. There are also specialized filters (graduated neutral density filters) that can darken portions of the image while leaving others untouched.
Or you could just continue to shoot in that lovely, filtered, foggy light. Early or late light can also work nicely.
Take care,
Dan
If you read the photographer’s notes along side the pictures at Galen Rowell‘s Mountain Light Gallery in Bishop, CA, you’ll find that many of his pictures involved days of waiting for the light, the clouds, the wind, the wild flowers, and so on to be just right.
Sometimes he would go to a place and take pictures at every hour of the day — pre-dawn to post-dusk — develop the roll and then figure out when to go back and take the “real” pictures.
Some of his award-winning photos were one execptional shot on one of severals rolls of film taken of the same scenery.
Thanks for the tips, guys…
At the very least I’m figuring out which light will work and which light won’t. Each generation of cheap point-and-shoots gets a bit better, which helps.
I’m trying tread the middle ground between being a true Photographer — buying expensive cameras/lenses, shooting n RAW mode, tweaking in Photoshop — and those who take no camera at all.
I’ve always figured that it would be computationally possible for a digital camera to address this issue by automatically capture and merge multiple exposures. (Possibly with multiple CCDs rather than with subsequent exposures)
It will be interesting to see the direction that the industry takes now that the “Megapixel War” is more or less over and we’re now starting to see improvements (like IS) that result in better pictures rather than just larger pictures.
It’s why Gambolin’ Man has to take about 10,000 images to get one of ’em right!
Great discussion Tom, I have often wondered about this myself.
DSD
My dad built a fully-stocked photographic lab in
our basement and by the age of ten I capable of
doing my own B&W photo work from shutter snap
to finished print. (I drifted away from it by
high school.)
Anyway, chemical photography is different and in
some ways still superior to digital imaging. In
particular, B&W (not color) would be able to
capture the range of light intensity. Then, in
the darkroom, you’d expose the print multiple
times and use techniques like burn-in and dodging
to produce the finished picture.
If you’re serious about digital, the best suggestion
so far is to use the .RAW format (produces a huge
data file) and fiddle around with software to get
the results you want.